


 Reply With Quote
So what was in the center section of the spec ops muffler? Were the 3 pipes coming from the front chamber cut a couple inches into the center chamber? Was there packing in the center chamber or was it open and empty?
Thanks
Brett


Ok here is my exaust modification to an already modded stock xb12 pipe. The pipe I selected was the Special OPS pipe. It was way too loud for me so I needed to create a similar scenario to the stock pipe yet change its tone. I wanted the valve for low end torque and I wanted a bigger note from the exhaust but not so loud my hearing would be effected.
Here is the pipe with cuts already in place using a hacksaw. Hacksaws work beautifully, make a fine cut and are easily controllable.
This view shows the pipe pulled apart. Once apart at these cut locations you will have three sections. The middle section needs to be hollowed out of any internal piping and or proprietary materials used by other modders.
The front section should have three stubs, each a different diameter. Pieces of standard fittings available at Autozone were used for the straight pipe. I think 1-3/4, 1-7/8, 2inch were used with 2 inch being the size of the outlet pipe. The pipe assembly has to fit into the middle chamber so use your judgement when making your pipe loop. The actual elbow is a half a donut from Deez or Central High Performance in 2 inch with a 2" radius. Cost about $50.00 and you have a half left over to sell or use in another mod.
The pipes just fit inside the can and need to be adjusted so the loop is hi at the loop end and the 2 " outlet pipe is leaned low to fit inside the middle section and still exit on the low side of the middle section. This view shows the end wall cut to shape, drilled with the hole saw and inserted into the end of the middle section. Remember to tack weld your loop and straight pipe so it does not shift around, there are quite a few pieces here.
Weld the rear jack partition so it is sealed. Also I drilled two 3/16 inch holes in the exit side of the loop much the same as the stock muffler. These holes vent into the middle chamber.
Here is the finished can after a coat of paint.
Here is the exhaust on the bike.
I will have a drive by video in a couple of days. So far its absolutely everything I wanted. Excellent grunt with muscle sound yet tame at speed so I can actually enjoy the long rides. Twice as loud as stock and half as loud as the gutted pipes. Tons of good pull, very minimal pop on decel. I will datalog this week also to see what that tells me. I love this mod.
Oh and here are the tools I used to make this mod. Mig welder, hacksaw, magical marker, hole saw, and tin snips for the jacking partition, I would recommend shears instead, the partition is 16 gauge mild steel.
BR
So what was in the center section of the spec ops muffler? Were the 3 pipes coming from the front chamber cut a couple inches into the center chamber? Was there packing in the center chamber or was it open and empty?
Thanks
Brett
Well there was only a lining of expanded metal in the center. I didn't see any packing. The pipes I saw were 2 inches into the chamber already when I cut it open. Pipe was purchased off ebay as OPS. It made it pretty easy to make my mod.
BR
Great write up. I look forward to seeing/hearing the video. I have been contemplating how I am going to modify my exhaust and what you did is one of the options I am considering.
Chance
Video video video ... u get the point
I will shoot a drive by video today, the stationary video always seems to leave something to be desired, probably because the bike is not under load. Under load this pipe sounds great. Will try to get vid on today.
BR
http://www.youtube.com/watch?v=cMd_GIxTeYoe
Hope this takes you to the stationary video.
BR
What is the distance from the front bulkhead to the top of the loop?
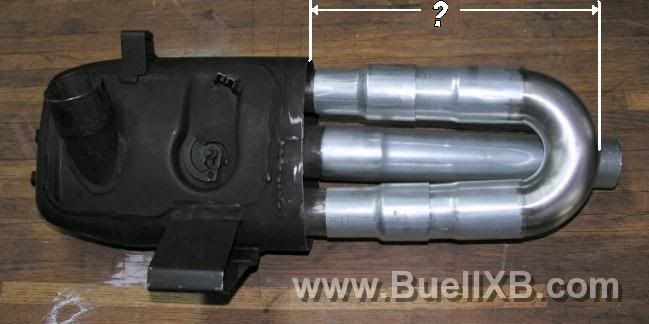
Its about 11.5 inches, it can go right up to the rear jacking partition that you will need to install. There is quite a bit of wiggle room with the adapters as their flanges are about 2 inches.
BR
Here is a drive by on the quiet side of the bike. The exhaust is facing the other direction. Can't wait to datalog.
BR
Edit: Fixed Youtube link
 Posting Permissions