-
EBR Exhaust mod
'Race bike' blah blah, but if you need to service ANYTHING besides the clutch-pack on the right side of the motor, you WILL be splitting the bike in 2 for an engine 'rotate'.
Cylinder timing chain, guides, clutch basket (or anything behind it), balancer, water pump, anything. You can't even drain the coolant properly. Why? Because the monster of the rear head pipe covers most of the engine and it's impossible to remove or even get to the header flange nuts without getting the frame out of the way by dropping the engine.
My particular 2014 #000024 has had a series of unfortunate events that made that specific surgery necessary way too many times in a row.
I have had to replace the clutch basket for rattly damping springs, I have had one of the clutch basket to gear bolts shear off at Chuckwalla and leave a hole from it's 11 billionty MPH exit in the inner clutch housing, the 'new' housing had a leak in the rotational seal in water pump, and the .03¢ washer that drains the coolant also has leaked. ALL of which require the bike to be split. Do you know how frustrating a .03¢ washer replacement is, when you have to sacrifice a WHOLE sunny Saturday to do it?! It's a six pack. Thats how frustrating it is, and whats this damn extra bolt go to?!?! I digress.
Ya, I'm pretty fast at it now. But thats not the point.
Front and rear stands on, left side controls off, muffler off, right side fairing off (SX), the ENTIRE intake system out, lower shock bolt off, a-frame ladder and straps to support the tail, scissor jack under the front of the engine, 6 engine mounts, and lower the jack/raise the tail.
And when your table is occupied because you got suckered into another project bike, your knees are gonna hurt. Both of them.

#Buellife
-
Ok ya so... the point.
I need a way to just remove the offending exhaust pipe easily, so I took it off, chopped it in half( ) and then tried to figure how to put it back together.
I chopped it at the straightest part of the pipe past the O2 bung, but before the bend. This would clear the inner clutch cover while still attached to the head. I got some stainless tubing I got to make tips from in the scrap pile that sleeved perfectly on the end of the header, and dammit if it didn't fit the part I cut.
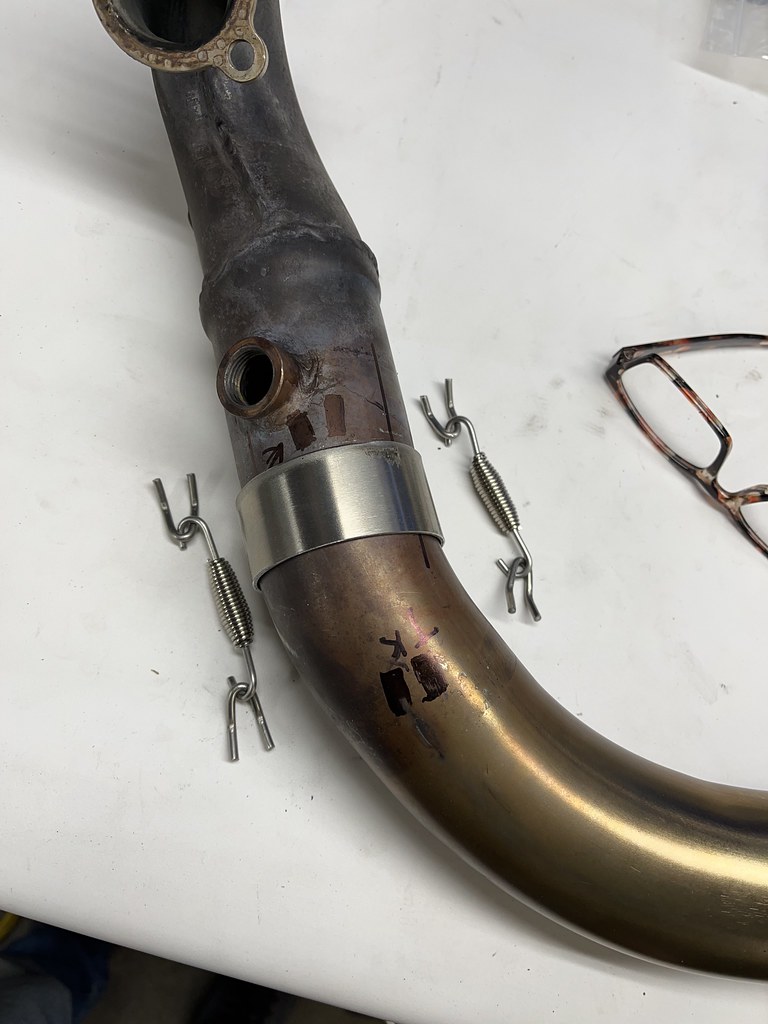
Mandrel bent or not, its a bit smaller at the OE bend. I sliced about .100" out with a band saw and hose clamped into the right diameter. WIN!
Got a pack of 60mm long muffler springs from the China shop along with a pack of stainless hooks. Maybe $10 total with shipping and I feel guilty enough I bought noodles for lunch and tipped well.
Last edited by Cooter; 12-16-2021 at 05:09 AM.
-
-
-
-
Senior Member

 Posting Permissions
- You may not post new threads
- You may not post replies
- You may not post attachments
- You may not edit your posts
-
Forum Rules


 Reply With Quote
 but when it comes to an obvious mod, well in the judgmental view of the critical masses... nope. I'll never be at Bud's level of a lifetime of aerospace technical perfection. It's good to have friends


 #Buelllife
 required to replace the rotary shaft seal on my NEW clutch cover, I can swap it out in a matter of minutes versus the a-frame ladder malarky. He's awesome. You should buy stuff.