


This is a quick write-up on how to build yourself a Wireless ECMSpy cable.
Just plug it in and forget it. When you want to tune your bike just pull into the garage, or bring your laptop outside, and connect wirelessly in seconds.
It will cost you about $30-$75 to build, depending on which BT Chip you use, and whether you put it in a fancy box or just seal it with rubber/epoxy.
To make this easier on everyone, I'm just going to do a rough translation of the one Gunter did. He took the original design and cleaned it up quite a bit by adding a simple 5v IC regulator.
I'm also going to see if I can get a cheap $10 USB dongle to work. If so, these will be really easy to make, and easy to replace if one gets fried.
Until then, here's a slightly modified version of the original
What you'll need:
1) BlueTooth Serial Module
2) 5v Voltage Regulator IC Chip (part# "78L05")
3) Deutsch IPD connector (part# "DT 06-4S")
4) 4 pins for connector above
5) Small piece of circuit board (you can find it at RadioShack)
6) Solder/Soldering Iron
7) About 6" each of Brown, Yellow, Red, and Black wire.
For the BT module, just Google "BlueTooth Serial Module" and you'll find several results.
Make sure you get one that is rated for 5v operating voltage. Some are 3.3v only, and they will burn up quickly when you run them at 5v. Also, make sure you get one with the built-in antenna. The modules with an external antenna have a longer range, but then you have to mess with mounting the antenna somewhere.
The one Gunter used ("BlueSMiRF") is about $65, but I've found other brands as cheap as $25 if you dig around.
This is what a typical BT module will look like:
Some BT modules have more pins than others for adding extra LEDs or buttons, but you really only need the four basic pins:
1) Data Transmit (Tx)
2) Data Recieve (Rx)
3) Ground (-)
4) Power (+5v)
Your module should come with a spec sheet that tells you what each pin is.
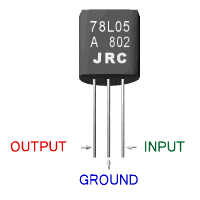
This is the 78L05 Voltage Regulator:
Your ECM has a 12v output. This chip will drop that down to a max 5v, so we can power the BT chip right through the ECM without needing batteries.
You can find these for about $0.25 a piece, but you may have to dump $2 for a pack of 10 and hand the rest out as Halloween candy. Check eBay.
Here is a pic of the connector plug:
This is the part that plugs into your ECM connector. go ahead and solder your 4 pieces of wire to the pins and assemble the connector. I usually use Black(-), Red(+), Yellow(Rx), and Brown(Tx), but you can use whatever.
If you're looking at the back of the plug (with wires sticking out towards you) and the clip on top, here is a pinout:
Top Left: +12v (no wire in the picture)
Top Right: Tx to ECM
Lower Left: Rx from ECM
Lower Right: -12v
Go ahead and solder the four wires into the connector pins, and assemble the connector.
Now we're ready to assemble the BT circuit.
The [+12v] wire from the ECM will go into the Voltage Regulator (VR) input. If you're looking at the flat side of the VR with the pins pointed down, it should be on the far right.
The [-] wire from the ECM will go to the center pin on the VR, then also connect to the (-) on the BT module.
The [Tx] wire will connect to the Tx pin on the BT module
The [Rx] wire will connect to the Rx pin on the BT module.
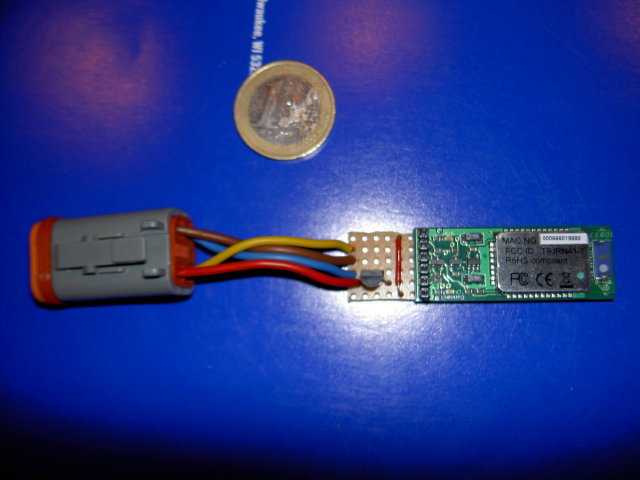
The completed unit should look something like this:
You're pretty much done at this point. You can make it watertight, either by sealing it in a box, or dipping it in some sort of "Plasti-Dip" coating (you can find it in the paint section at Lowes or Home Depot).
Now just follow the software setup instructions that should have come with your BT module.
Here's a general guideline for setup:
1) Turn your Buell ignition to "On", make sure the kill switch is set to "Run" (BT will only have power when the ECM is activated)
2) Activate the BT console on your laptop
3) Search for new devices. It should find your new BT ECMSpy cable.
4) Set up the BT Serial Connection, take note of the COM port it is assigned to.
5) Start ECMSpy, choose the BT Serial COM port.
6) Connect!
Like I said, super-quick write up. If I left anything out, please chime in and let me know. I'll try to answer any questions as best I can.
Again, thanks to Gunter at ECMSpy for cleaning up the design and taking most of these pictures.
-Tim


 Reply With Quote


